Configuring Receipt Templates
Overview
Each time you print in the Evergreen web client, the output is generated from a pre-designed template. You can customize the template for each type of receipt using the Receipt Template Editor. Templates are formatted using HTML and include macros to pull data from Evergreen.
|
Receipt templates are unique to each workstation. Changes made on one workstation will not affect other workstations. To use the same templates across multiple workstations, you must export from one and import to the others. |
Accessing the Receipt Template Editor
To access the Receipt Template Editor:
-
From the portal page, click Receipt Templates
 Figure 1. Receipt Templates link in portal
OR
-
Navigate to Administration → Workstation → Print Templates

The editor displays:
-
A dropdown menu to select different templates
 Figure 3. Print Template Controls
 -
The template code on the right
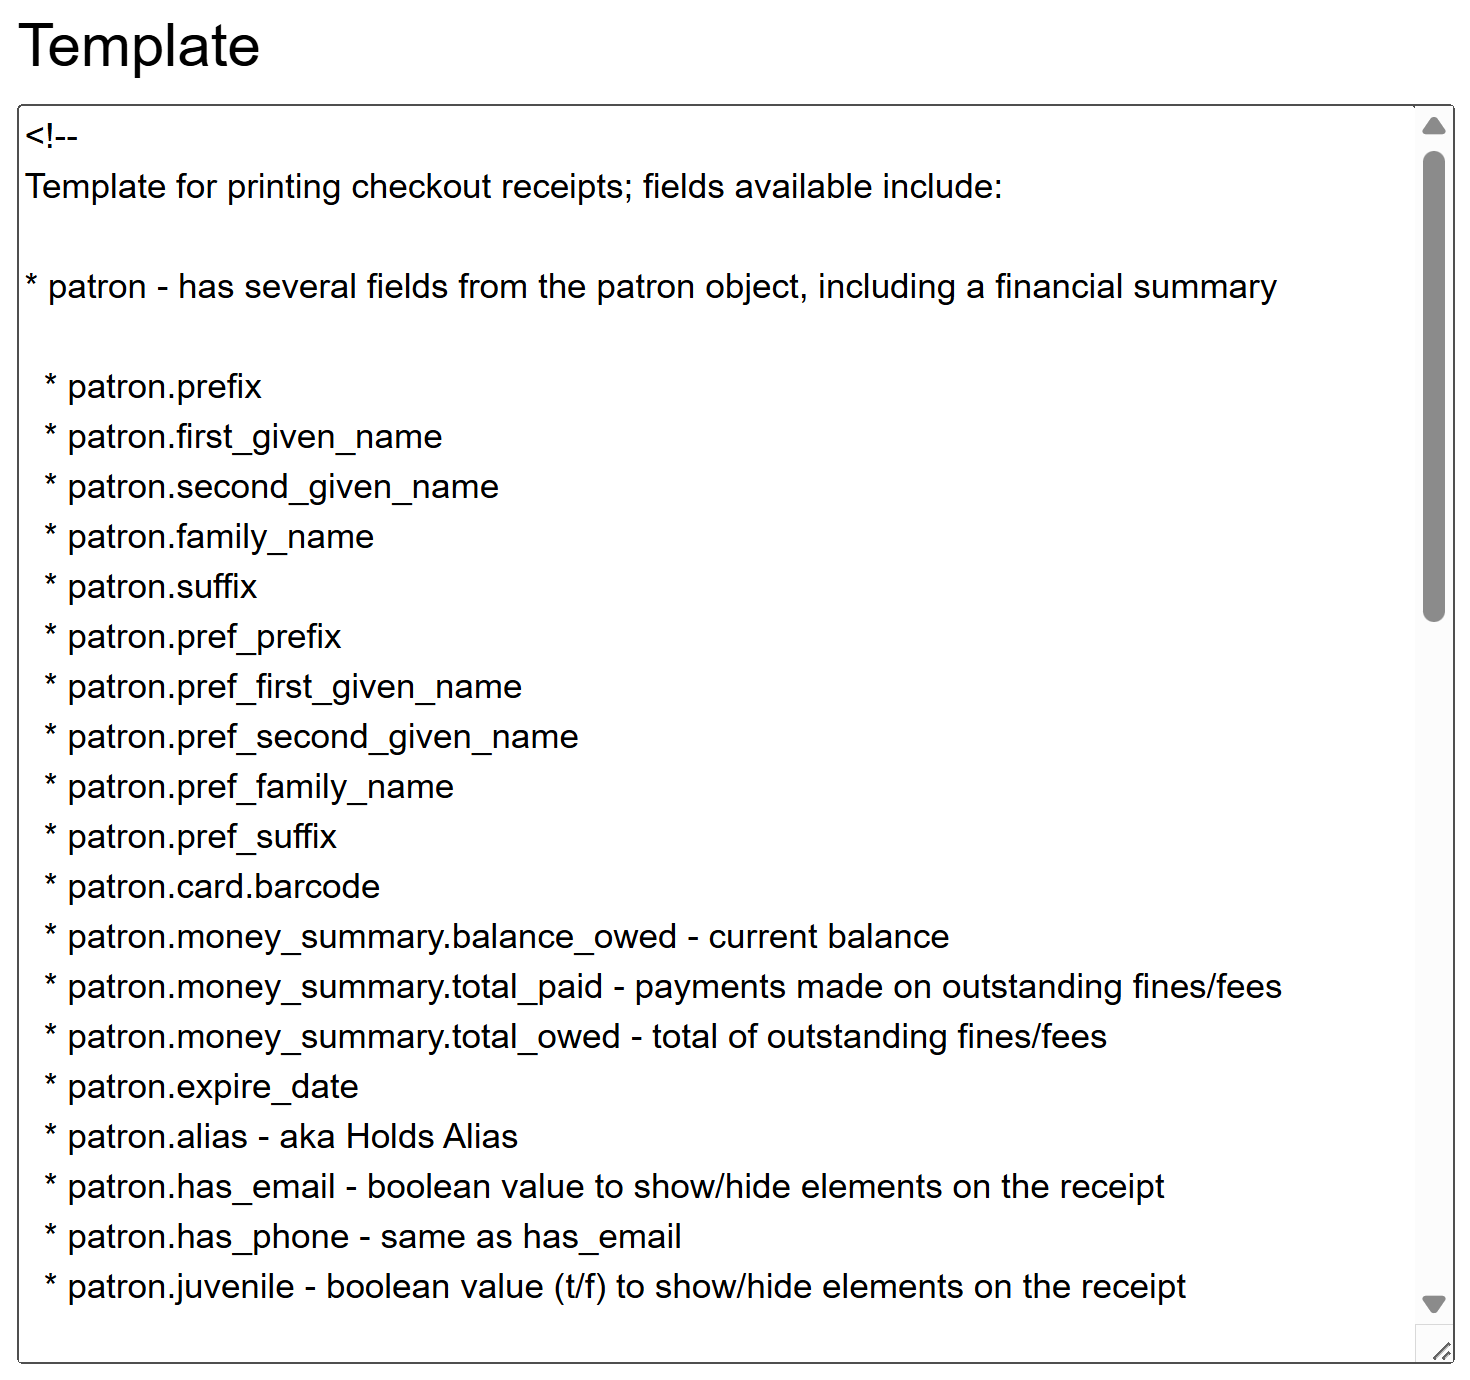 Figure 4. Print Template Code
 -
A preview of the template on the left with sample data
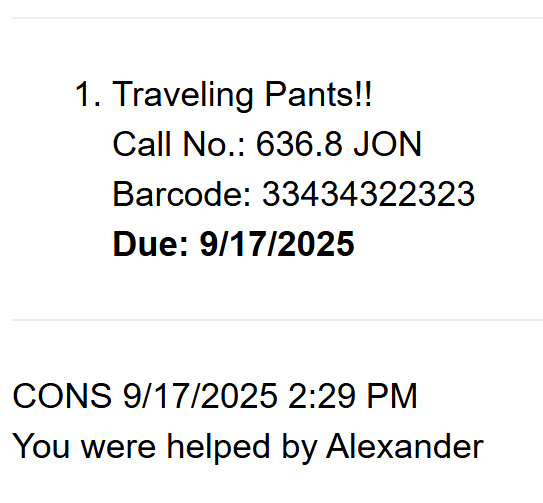 Figure 5. Print Template Preview
Understanding Receipt Template Structure
Receipt templates combine two main elements:
-
HTML formatting - Controls the visual appearance of the receipt
-
Evergreen macros - Pulls data from the system (patron info, item details, etc.)
|
For a complete guide to HTML formatting options for receipts, see HTML Formatting for Receipt Templates. |
Working with Macros
Macros are placeholders that pull data from Evergreen. They are enclosed in double curly brackets {{ }}.
Common Macros
| Macro | Output |
|---|---|
|
Patron’s first name |
|
Patron’s last name |
|
Patron’s barcode |
|
Library name |
|
Current date and time |
|
Staff member’s name |
Common Receipt Customizations
Adding Patron Name to Receipts
To add the patron’s name to checkout, items out, or renewal receipts:
<div>Welcome {{patron.first_given_name}} {{patron.family_name}}!</div>Output Example: Welcome Jane Smith!
Large Text for Hold Shelf Slips
For easier identification on hold shelves:
<font size="5"><b>{{patron.family_name}}, {{patron.first_given_name}}</b></font><br/>Output Example: Large, bold text displaying: SMITH, JANE
Using Preferred Names
To display a patron’s preferred name if available:
<div style="font-weight:bold; font-size:150%">
  <span ng-if="patron.alias">{{patron.alias}}</span>
  <span ng-if="!patron.alias">
    <span ng-if="patron.pref_family_name">{{patron.pref_family_name}},</span>
    <span ng-if="!patron.pref_family_name">{{patron.family_name}},</span>
    <span ng-if="patron.pref_first_given_name">{{patron.pref_first_given_name}}</span>
    <span ng-if="!patron.pref_first_given_name">{{patron.first_given_name}}</span>
  </span>
</div>
Output Example: Bold, enlarged text showing: Johnson, Robert (or alias if set)
"You Saved" Message
To show patrons how much they saved by borrowing:
<div ng-init="transactions.subtotal=0">
  <li ng-repeat="checkout in circulations">
    <div ng-init="transactions.subtotal=transactions.subtotal -- checkout.copy.price||20">
      {{checkout.title}}
    </div>
  </li>
</div>
<div style="border:3px dotted #000;text-align:center;padding:10px;">
  You Saved: {{transactions.subtotal | currency}} by borrowing from the library!
</div>
Output Example:
• The Great Gatsby
• To Kill a Mockingbird
• Pride and Prejudice

┌─ ─ ─ ─ ─ ─ ─ ─ ─ ─ ─ ─ ─┐
│   You Saved: $65.00     │
│   by borrowing from     │
│   the library!          │
└─ ─ ─ ─ ─ ─ ─ ─ ─ ─ ─ ─ ─┘
Self-Service Hold Codes
For privacy on public hold shelves, display a code instead of the full name:
<hr/>
<div style="font-size:400%;writing-mode:vertical-rl;text-orientation:mixed;height:300px;width:300px;">
  {{patron.family_name | limitTo:4}} {{patron.card.barcode | limitTo:-5}}
</div>
Output Example: For patron Smith with barcode ending in 67890, displays SMIT 67890 in very large text, oriented vertically.
This creates a code using the first 4 letters of the last name and last 5 digits of the barcode.
Adding Images to Receipts
Adding Scannable Barcodes
To add a scannable barcode to receipts:
-
Install the Codabar font on your workstation
-
Download from: Codabar Font
-
Extract and install
CodabarMedium.ttf -
Restart your browser
Add this code to your template:
<div align="center" style="font-family:'CodabarMedium';font-size:25pt;width:100%">
  B{{patron.card.barcode}}D
</div>
Output: Displays as a scannable barcode when the Codabar font is installed. The barcode will show the patron’s card number between the start (B) and stop (D) characters.
|
Best results are achieved with Epson receipt printers. |
Available Templates
| Template | Purpose | Access Point |
|---|---|---|
Checkout |
Items checked out |
Check Out screen → Done |
Checkin |
Items checked in |
Check In screen |
Items Out |
Current checkouts list |
Patron → Items Out → Actions |
Renew |
Renewed items |
Circulation → Renew Items |
Hold Shelf Slip |
Hold ready for pickup |
Triggered at check-in |
Transit Slip |
Item returning to home |
Triggered at check-in |
Hold Transit Slip |
Item filling hold elsewhere |
Triggered at check-in |
Bills, Payment |
Payment receipts |
Bills screen → Apply Payment |
Bills, Current |
Outstanding bills |
Bills → Actions → Print Bills |
Bills, Historical |
Bill history |
Bills → History → Print Bills |
Holds for Patron |
Patron’s holds list |
Patron → Holds |
Holds for Bib Record |
All holds on a title |
Catalog → View Holds |
Patron Address |
Mailing label |
Patron → Mailing section |
Item Status |
Item information |
Item Status screen |
In-House Use List |
In-house use report |
Circulation → In-House Use |
Exporting and Importing Templates
To use the same templates across multiple workstations:
Exporting Templates
-
Make your changes and click Save Locally
-
Click Export Customized Templates
-
Save the downloaded
.jsonfile -
Rename the file descriptively (e.g.,
library_receipts_2024.json)
|
Export includes ALL receipt templates, not just the currently selected one. Only customized templates will export. |
Best Practices
| Practice | Benefit |
|---|---|
Test templates before busy periods |
Avoid disruption during peak hours |
Keep template backups |
Quickly restore if issues occur |
Document customizations |
Easier troubleshooting and training |
Use consistent formatting across templates |
Professional appearance |
Include essential information only |
Reduces paper usage and clutter |
Troubleshooting
| Problem | Solution |
|---|---|
Changes not appearing |
Click Save Locally and refresh browser |
Preview shows $0.00 for prices |
Normal - actual prices appear when printing real transactions |
Template won’t export |
Ensure template has been customized (not default) |
Barcode won’t scan |
Verify Codabar font is installed and browser restarted |
Images not displaying |
Check URL is direct image link (ends in .png, .jpg, etc.) |
Related Documentation
-
HTML Formatting for Receipt Templates - Complete HTML formatting guide
-
Printing Setup - Configure printers and Hatch
-
Printing in Firefox - Firefox-specific settings
-
Printing in Chrome - Chrome-specific settings
-
Check Out - Using checkout receipts
Next Steps
After configuring your receipt templates:
-
Set up your printers for optimal output
-
Export your templates for backup
-
Import templates to other workstations
-
Train staff on any customizations made